A Step-by-Step Guide to Collaborating Remotely to Make Music (Part 2)
by Sylvain Carton
Date Posted: September 14, 2020
Image by Josh Sorenson
Collaborating with others has always been a huge part of the musical performance experience. Until fairly recently, this was limited by physical location. Today, however, there are a lot of tools that allow people to collaborate over long-distance.
Although truly live performances with musicians in different locations are not always possible, groups can still produce "concert like” videos where the audience can watch and listen to everyone playing "together."
This has been possible for some time, but, with social distancing practices enacted throughout the world, and virtually all concerts cancelled, this has become a go-to for many projects. While many professionals utilize this technology, it has also become a valuable resource for music educators and their students for teaching and learning remotely.
Getting Started
To get started you really do not need much, a smart phone and a pair of headphones will get you going (see the video of part one of the Collaborating Remotely series where I demo the Acapella App below).
Of course, you can also go much deeper in production quality if you invest in, or have access to, a home studio setup of some sort along with video editing software.
First step
Whatever your setup, the first step (obviously) is to have a piece of music in mind to play and people you would like to play/record it with.
Second Step
Second, you need to decide what your process is going to be and communicate that as clearly as you can to everyone.
I have recently done a few of these projects, both as a participant and as the leader. Below is a process that I found worked well for me as a leader.
My setup:
Audio:
Instrument: Saxophone/Flute/Guitar
Microphone: AKG C414 Condenser microphone / Coles 4038
Preamp: LA610 Preamp / BAE 1073
Recording Interface: Apollo 8 recording interface
Computer: Macbook Pro
Recording Software (DAW - Digital Audio Workstation): Logic Pro X (Protools, Ableton Live, Digital Performer, Garageband, Reaper, etc...work great too)
Video:
Camera: iPhone (I also used the audio from the iPhone video)
Computer: Macbook
Video Editing Software: Final Cut Pro
Here is how I led my most recent video collaboration:
1. Create a Project!
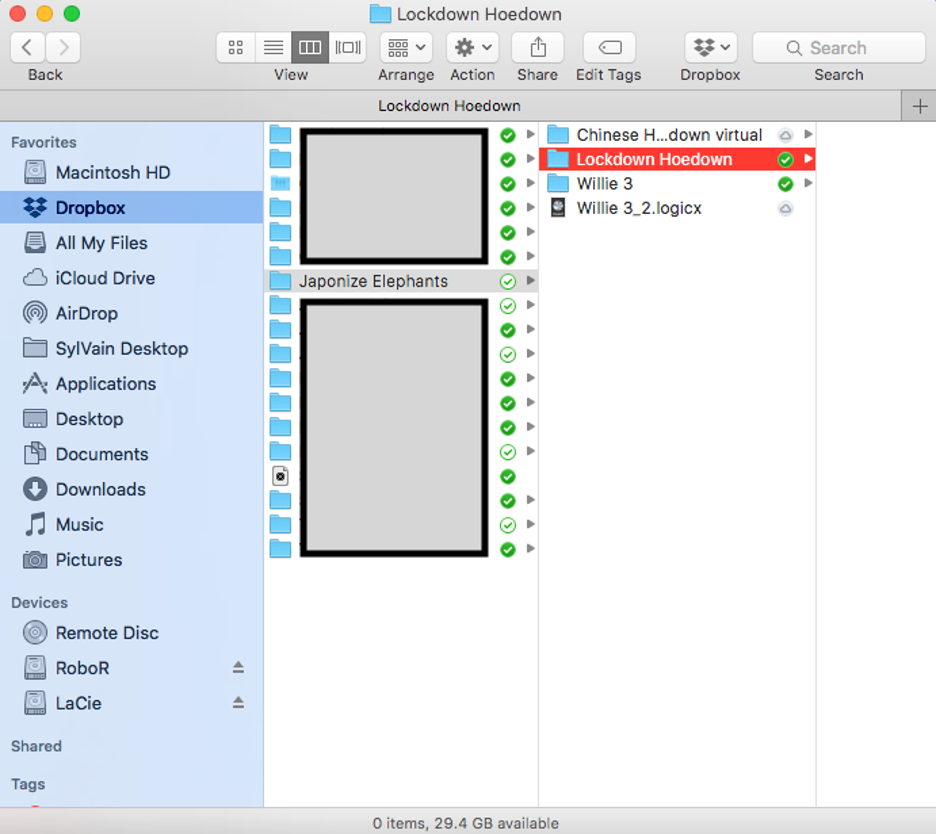
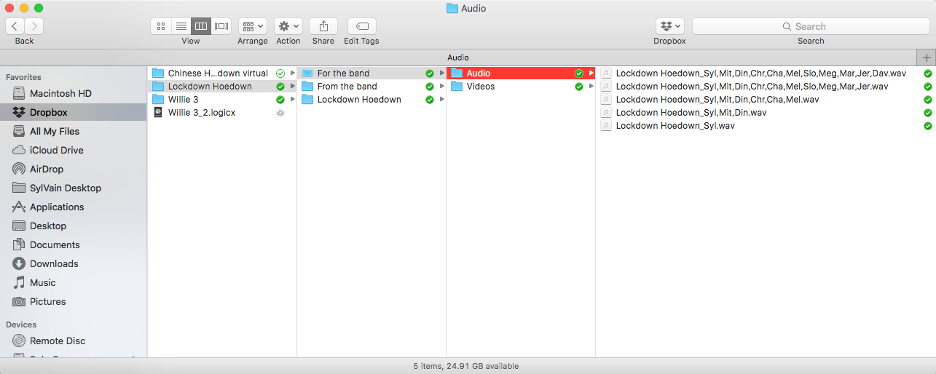
I started by creating a parent folder in Dropbox where I could keep all of my project files organized.
Inside that folder I created a group folder from which I could share audio, video, and charts with the rest of the group. You can also use Google drive, send larger files using WeTransfer or Hightail, or send out mp3s through email.
2. Set Your Settings!
Make sure that you know what your DAW (Digital Audio Workstation) settings and video settings are before you start.
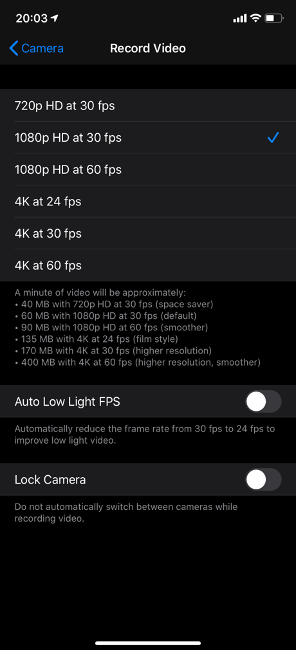
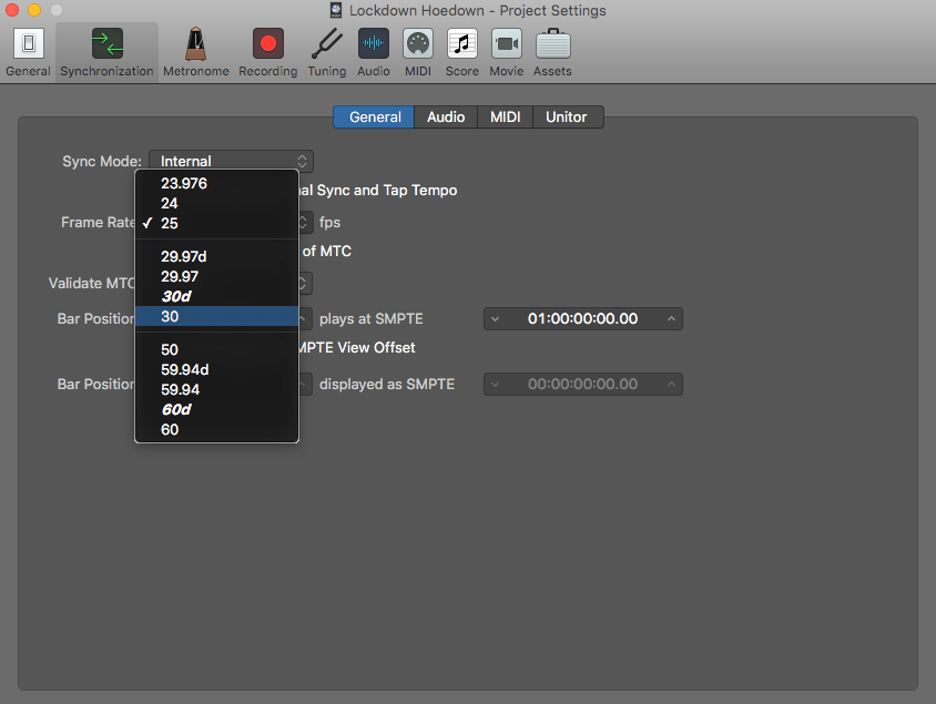
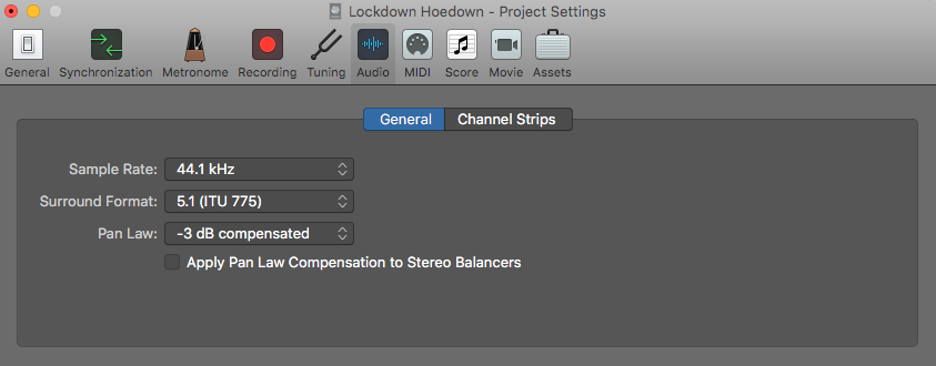
I have an iPhone and the default settings on my phone are 1920 x 1080, 30 fps for the video and 44.1k for the audio. I set up my Logic session to match those settings.
I asked that everyone (when possible) match those settings and that they record their video in landscape mode (horizontal layout). Landscape mode gives a little more flexibility when cropping/editing the videos.
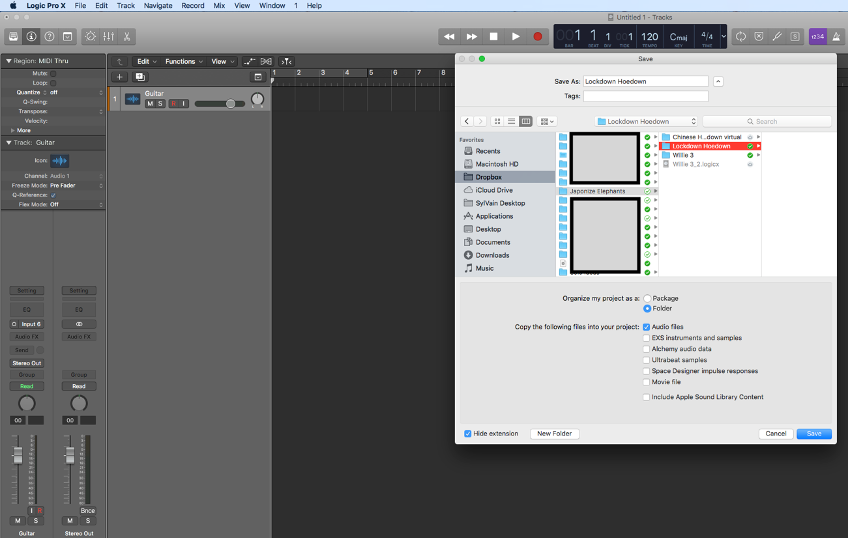
Save Logic project to master folder:
Logic Video Settings:
Logic Audio Settings:
3. Start the Band!
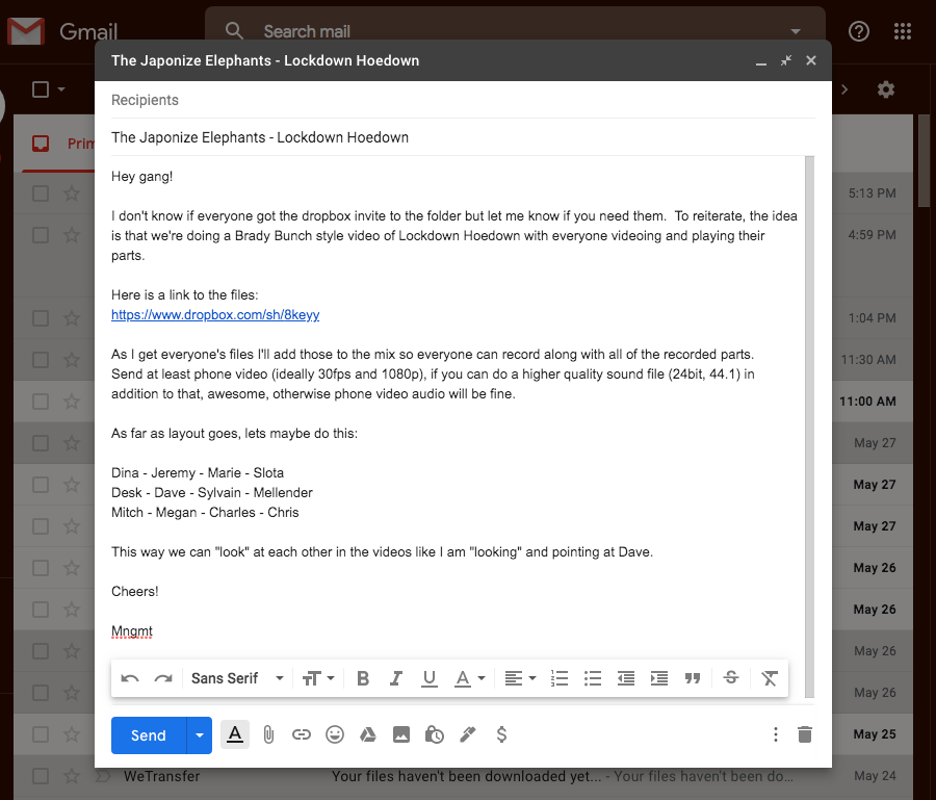
Although it is not necessary, bringing everyone together in an email/text thread can help create a sense of community that I find helps the music come to life.
It can also be more efficient to simply reach out to people individually so no one (other than you) is overwhelmed with communications. I chose the group email thread.
4. Be the D.P. (Director of Photography) and decide on the visual aesthetic.
As a group we decided to do go for the "Brady Bunch" vibe with everyone in squares.
To add an interactive element to the video I created a layout so everyone knew where they would end up (in the final video) and could then "look" at the other band members as they played or talked.
Here was the layout (audience perspective):
Vibes - Accordion - Voice - Violin
Desk - Percussion - Guitar - Bass
Flute - Sax - Trumpet - Banjo
This step is not completely necessary...but this is a video after all, and you are ultimately the director.
5a. Record your part!
Once the session in Logic is set up, I started by pressing record in Logic, then on my phone.
I counted in and clapped once to create a sync point, which helps line up all of the video and audio files, waited some time and then counted in the tune and recorded my guitar part.
The clap provides both a visual cue for the video (hand/arm movement) and a visual cue in the audio (a spike in the sound wave pattern) giving you a couple of ways to sync everyone's files (like a clapboard in movie shoots). When you are done assembling all of the parts you can trim the clap out of the video. I chose to make it part of the video.
5b. Add any necessary cues.
I wanted the tune to have some flexibility in the time (natural push and pulls of tempo) so I did not record to a click/metronome.
To help keep everything together in spots where you are either not playing or just holding chords out, you would need to create a click track on a separate track by tapping out the time. This "click" track will not make it into the final mix. It is definitely much easier to initially record to a built-in click, and lock to the grid.
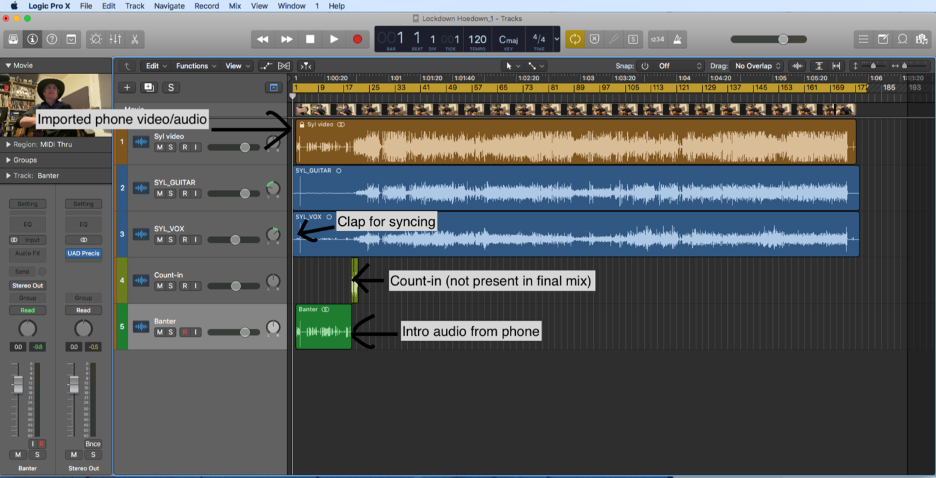
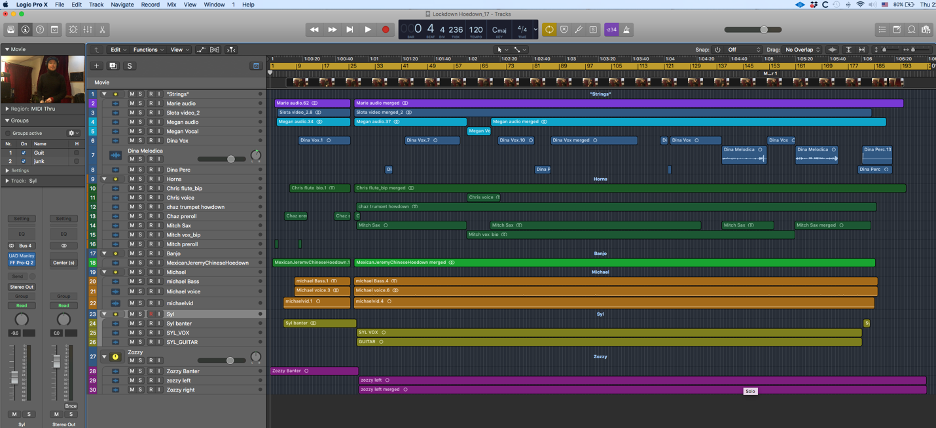
Because I wanted to use the audio from my iPhone video, I imported the video into my Logic session and extracted the audio.
I then synced the audio I had just recorded by lining up the claps.
I created a track for the banter (from the phone video) and extended the count-in at the beginning of the tune.
Logic session:
6. Create the foundation!
I bounced/rendered my part w/cues for the band to play along to in a subfolder of my main project Dropbox folder entitled "For the band."
Make sure that the stems/audio files you are sending out to everyone always start at the beginning of the project (01:00:00:00.00) and instruct everyone who is using a DAW to record to do make their audio start from the same place as yours. This is will make it much easier to line the audio up when you are bringing everyone's audio into your DAW session.
I had a few people on my projects with only phones to record with and from them I received a video file only.
For those submissions I had to import the video into my logic session, extract the audio, and then line up the video and audio from the video using the "count in to clap" at the beginning.
Everyone's clap can be microseconds off so it may take some listening and a bit of adjustment to get the audio in exactly the right spot, but, if all of the files are set to the same settings as your project, that should be fairly quick.
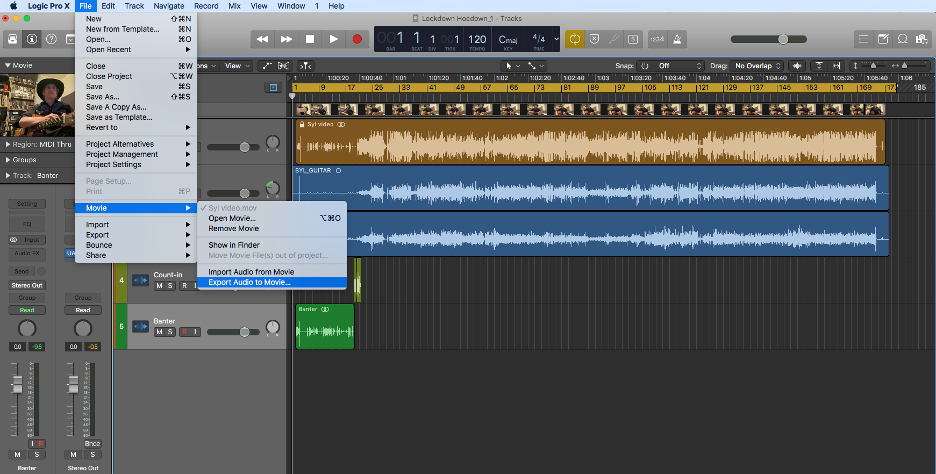
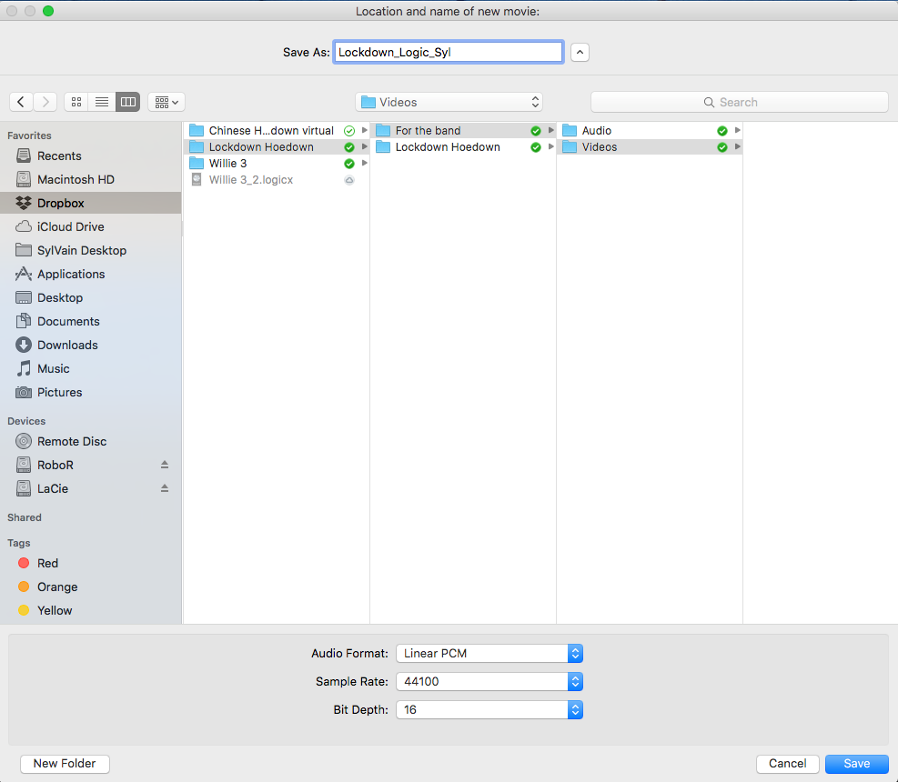
Export Audio to Movie:
Save to shared Video folder:
Bounce audio file:
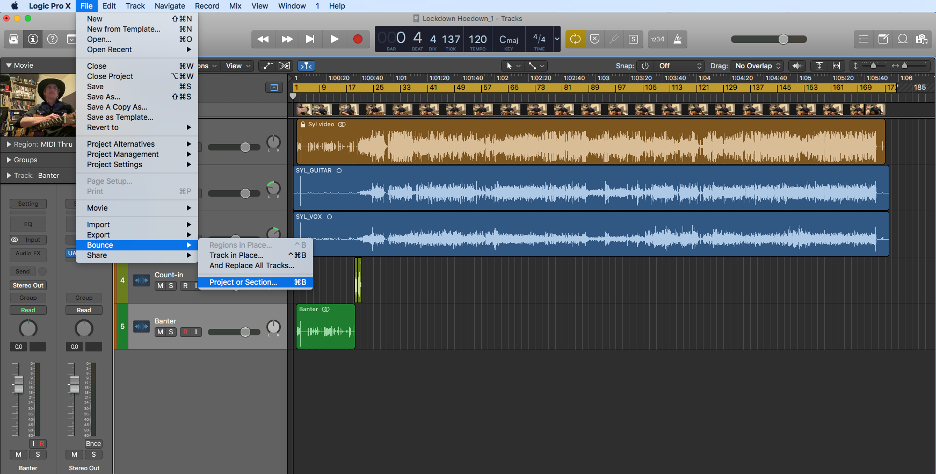
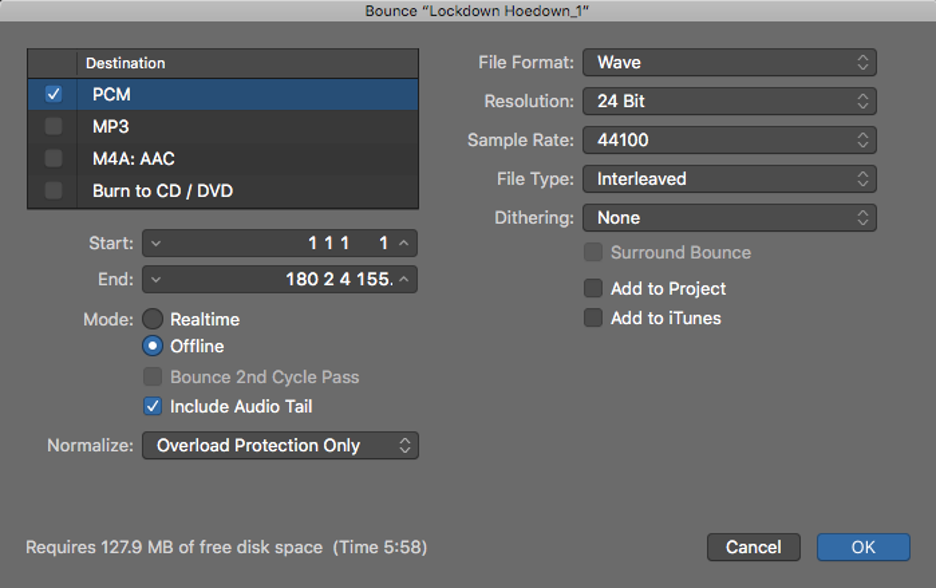
Select bounce settings:
Save to shared Audio folder:
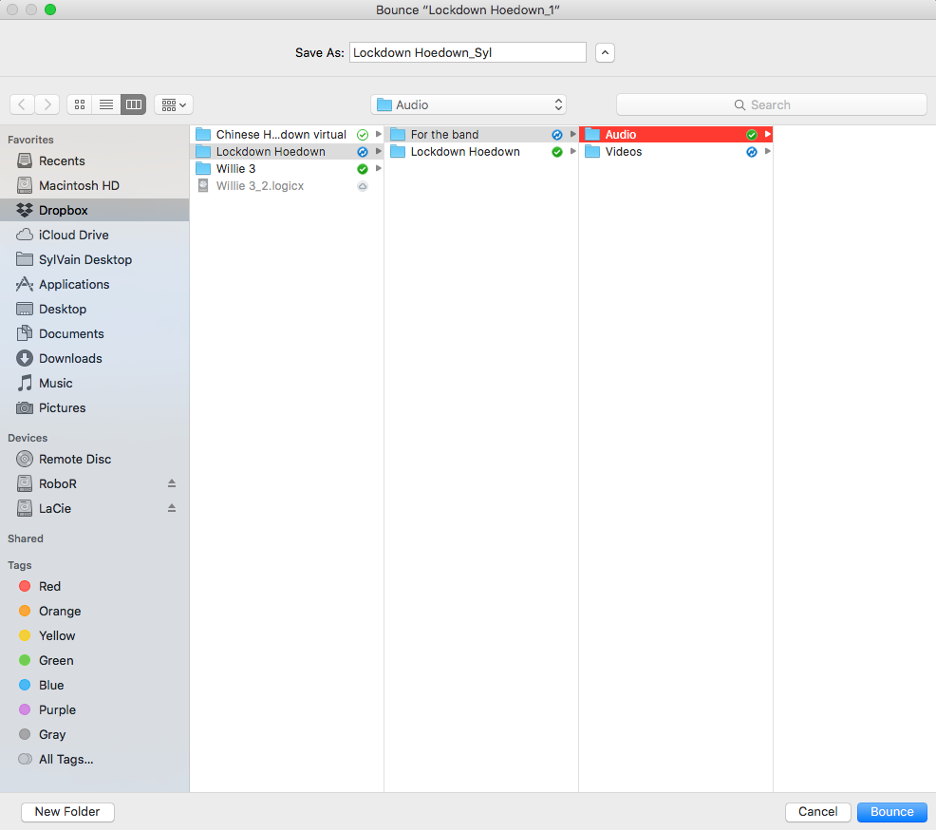
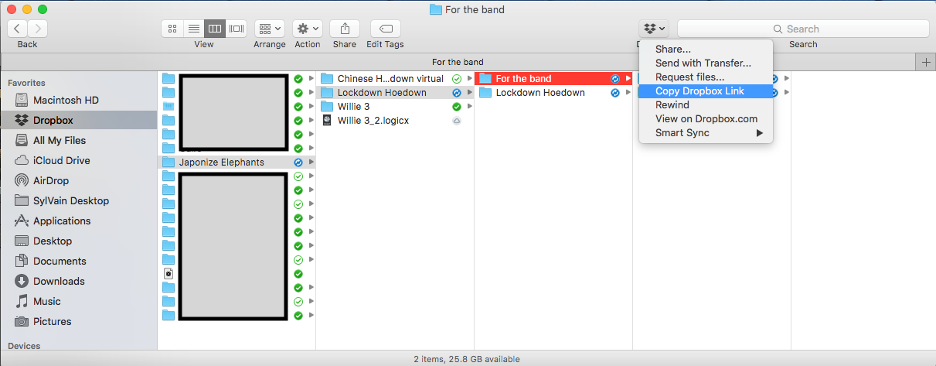
Share via Dropbox:
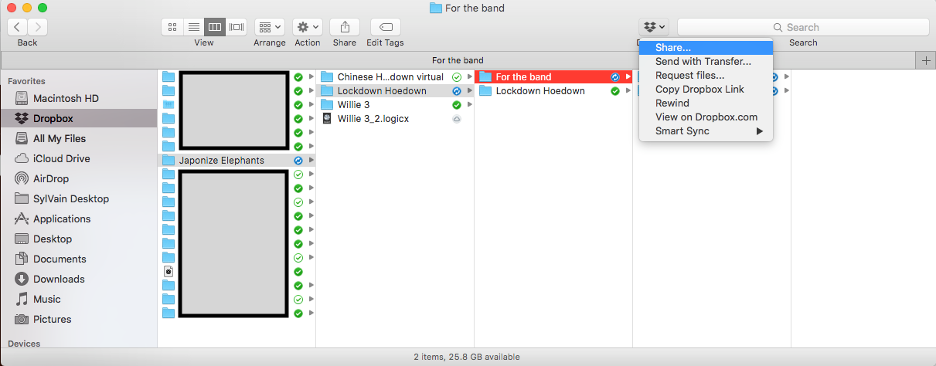
Share as an email-able link:
7a. Send out the call for submissions!
I sent out my stems for everyone to record to, accompanied with detailed instructions.
In addition to the audio files, I sent out a version of my video so everyone could use that as reference for style/vibe/etc...
Depending on the group/music you may choose to send the files to certain people first. Ideally, I would add each person one by one to the project, updating the mix I send out after each submission to give the next person in line as many parts to play along to as possible.
For example, having played a rhythm guitar part I would send the project to the percussionist first.
When they send me their file(s) back, I would make a rough mix to include their parts, and then would send that new mix to the bassist. When I get the bassist's part back, I would mix that in and send that new mix to the tenor, etc... With my most recent project, time was of the essence and everyone in the project was very busy, so I just sent my stems out to everyone at once.
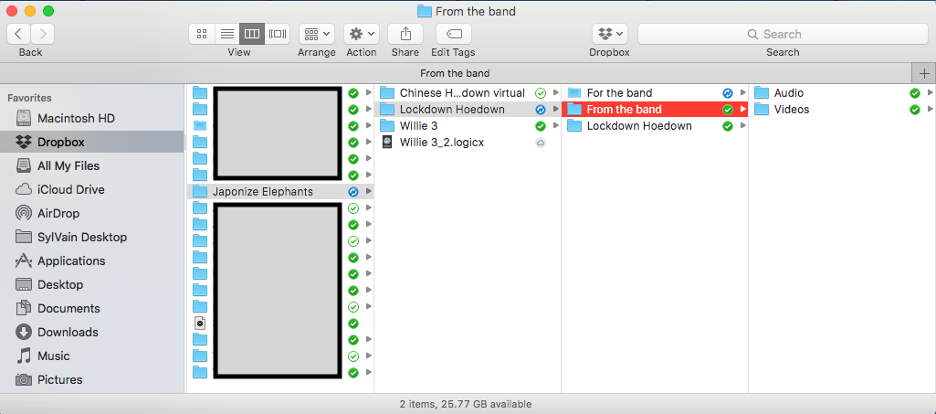
I also created a Dropbox folder in which to receive everyone's files. I copied files they uploaded to the shared folder and saved files that were sent via WeTransfer, Hightail, Google Drive, etc...
Send your email with all pertinent info/links/etc...:
Create a "From the Band" folder:
7b. Update the mixes as you go.
This is not completely necessary, but it can help the music gel.
As I would get parts back, I would mix them in and send the updated mix out to everyone. This gave people as many parts as possible to play along to for both intonation and feel.
I also started piecing together the videos as soon as I could and shared those as soon as possible so everyone could get on the same page regarding the "look" of the end product.
For the people who sent high quality audio along with their phone audio, I worked in some of their phone audio to give the sound a more "live in the room" feel. This definitely was an extra, non-essential step, and a bit more tedious, but worth it in the end, especially for the banter at the beginning and end of the tune.
A quick turn around on your part will also help everyone stay engaged and focused on the project. When you aren't in the same room as the group you are working with you can get easily distracted...or at least I can, so keeping things moving keeps things on track!
Save updated mixes to shared Audio folder:
8. Final music mix!
Because I had been updating the mix and videos as people submitted their files, once I had received and added the last missing part to the project my audio mix and video were already almost done.
Do a final mixdown of all of the audio:
9. Cut and Print!
After the mix I did a quick mastering of the track and then it was ready to bring into the video side of the project.
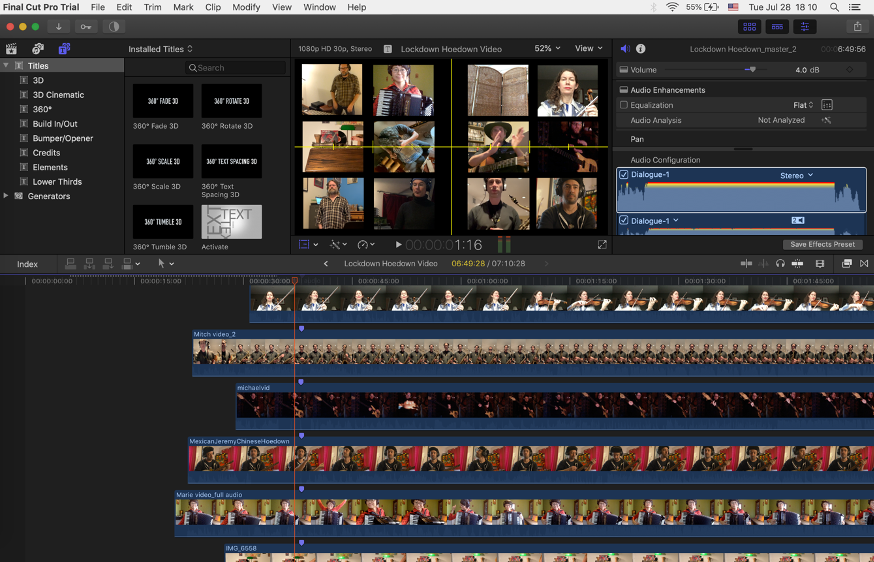
Assembling the Video
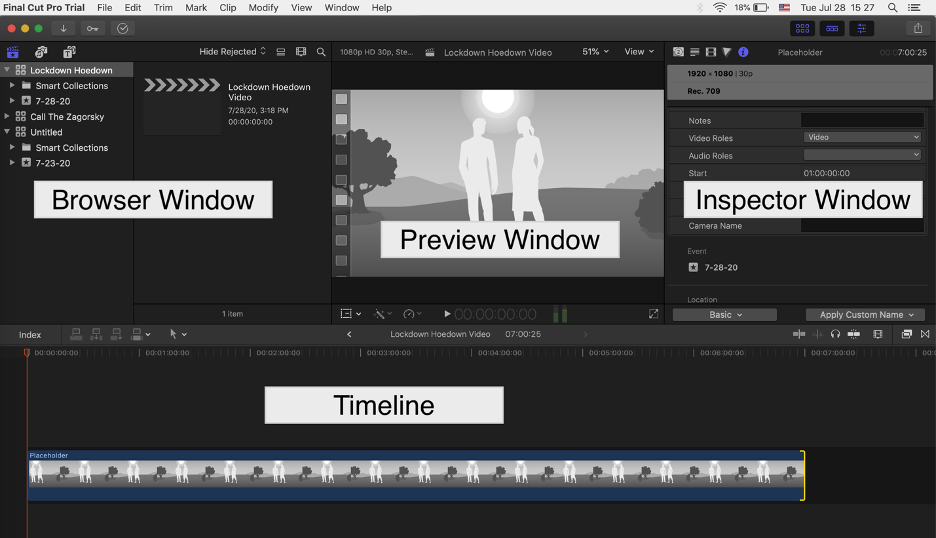
Once you begin receiving videos you can begin to setup the video side of this project, or you can wait until the audio is finished and you have received all of the videos. I used Final Cut Pro, but Adobe Premiere and Avid are also great. I was and still am figuring out Final Cut Pro, so there may be a more direct way to get to the end product...but here is how I put together my videos.
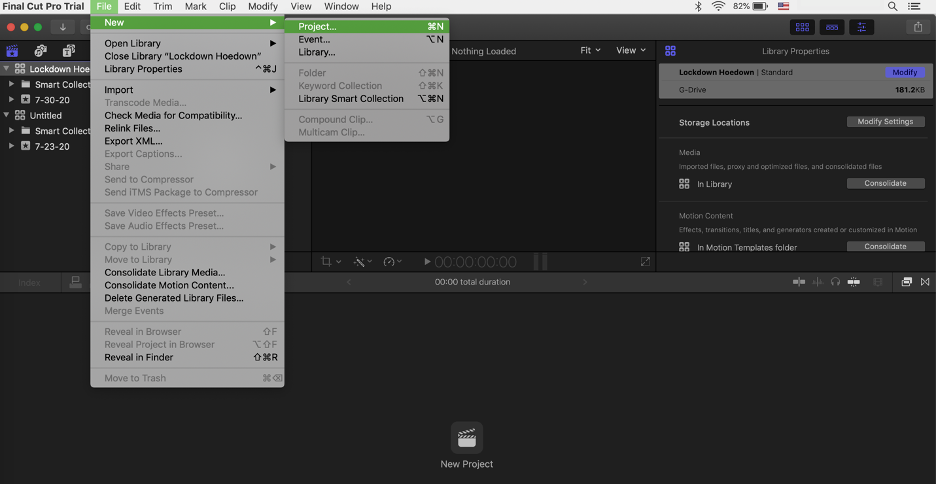
1. Create a Library!
I went to the "File" tab, selected "New - Library...", then saved into a new folder I created on an external hard-drive. The Library is essentially the "room" where all of your project related files will live.
I recommend having your project live on an external drive, so start by saving your library to a dedicated folder in an external drive. Be sure to have a lot of space available on that drive since video projects tend to balloon in size very quickly.
Create Library:

Save to dedicated folder on external drive:

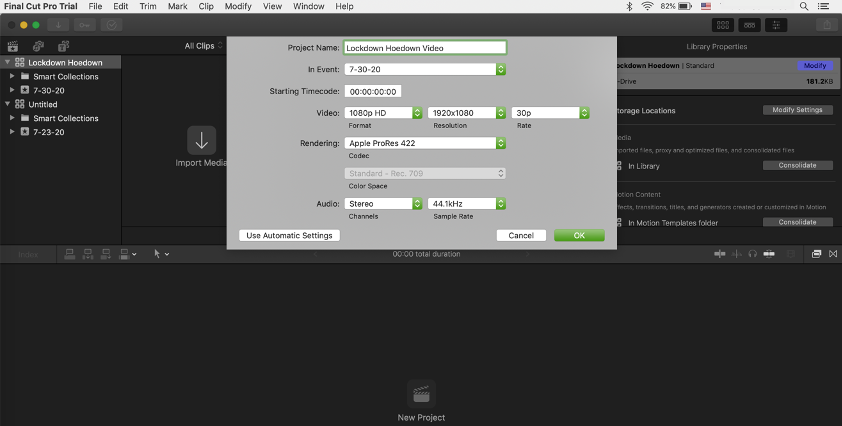
2. Start your 'Project'!
Select the new Library you just created in the Final Cut "Browser" window, go to the "File" tab and select "New - Project...", name your project, click on "Custom Settings," adjust the settings if you need to (I had mine set to 30 FPS and 44.1 kHz since those are standard iPhone settings), save, and then click on "OK" to start working!
Create your Project:
Set your project settings:
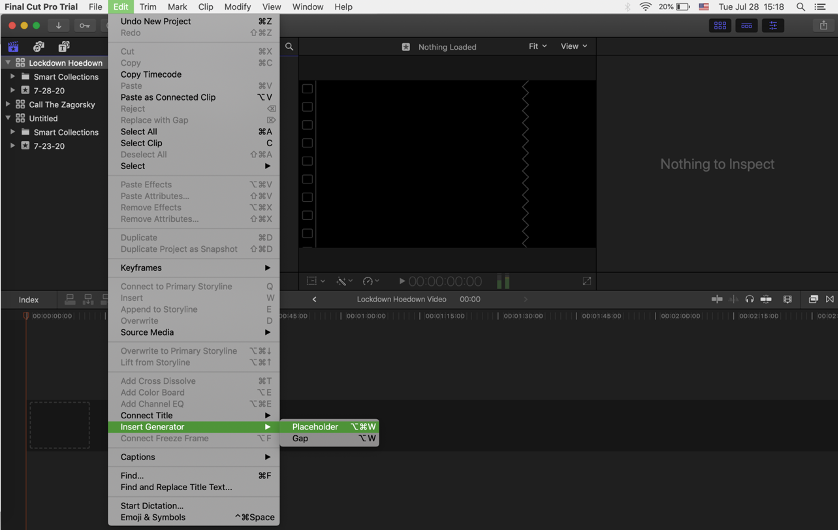
3. Set the Background!
In the menu bar select "Edit - Insert Generator - Placeholder."
Because this video has multiple videos to layout, it is necessary to create a backdrop against which all of the videos and audio can be positioned (somewhat like a chalkboard or bulletin board).
Once you create the placeholder in the timeline, drag it out so that it covers the length of the video project. In my case the song was about 7 minutes long.
There are a host of different backgrounds to choose from, but, since I just wanted a black background, I selected "Placeholder" and then hid it by pressing 'v' which is the shortcut for "disable clip".
Create the background for the videos:
Extend the Placeholder to the length of your video:
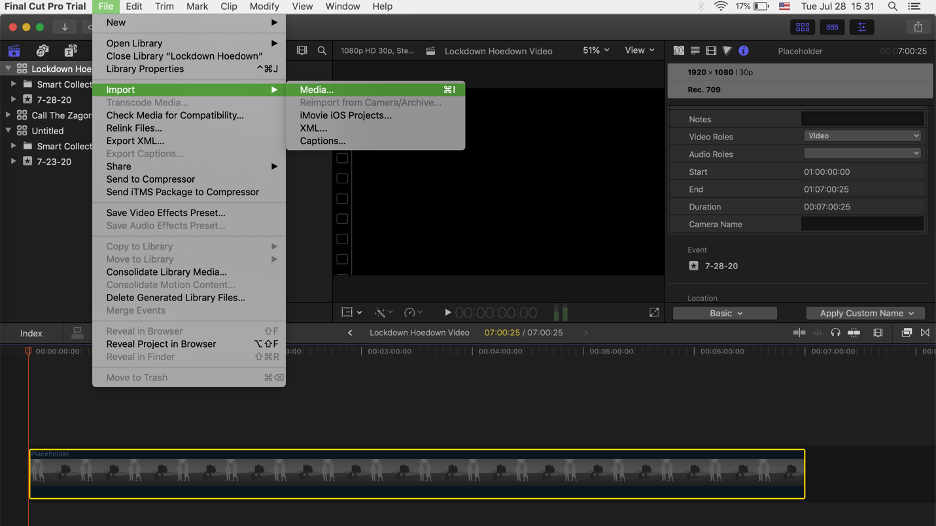
4. Import the Videos!
In the menu bar select "File - Import - Media" to import videos and/or audio files into the project. If you have your "From the Band" folder all setup this part should be easy.
5. Drag the videos into the Timeline!
Once the videos are in the project folder, drag them into the timeline.
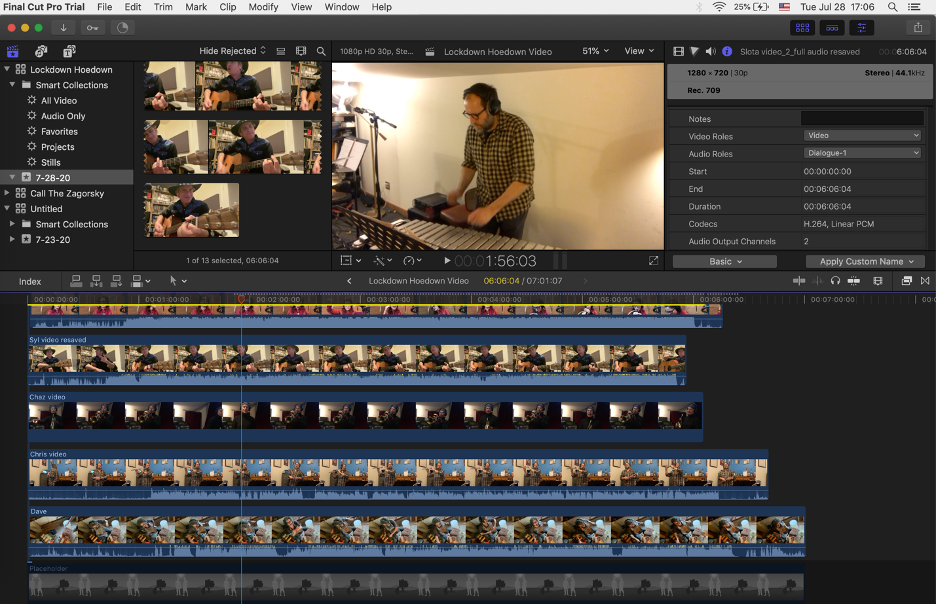
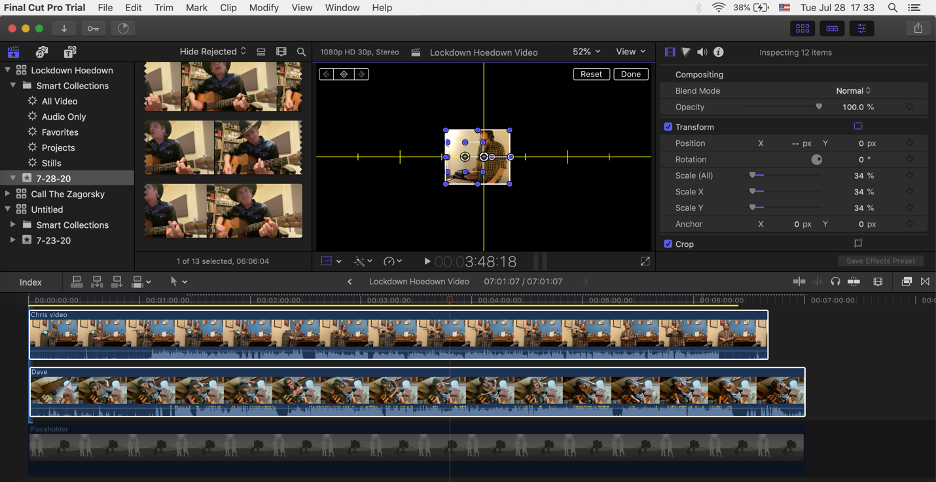
6. Resize, Crop, and Position the videos!
To get all of the videos to appear on the screen you will need to resize, crop, and then position them where you would like them to go.
The top video in the timeline where the scroll bar/playhead is will be the only video visible until you resize/crop the videos. I had 12 videos to place so I decided on 3 rows and 4 columns of video squares with some border in between.
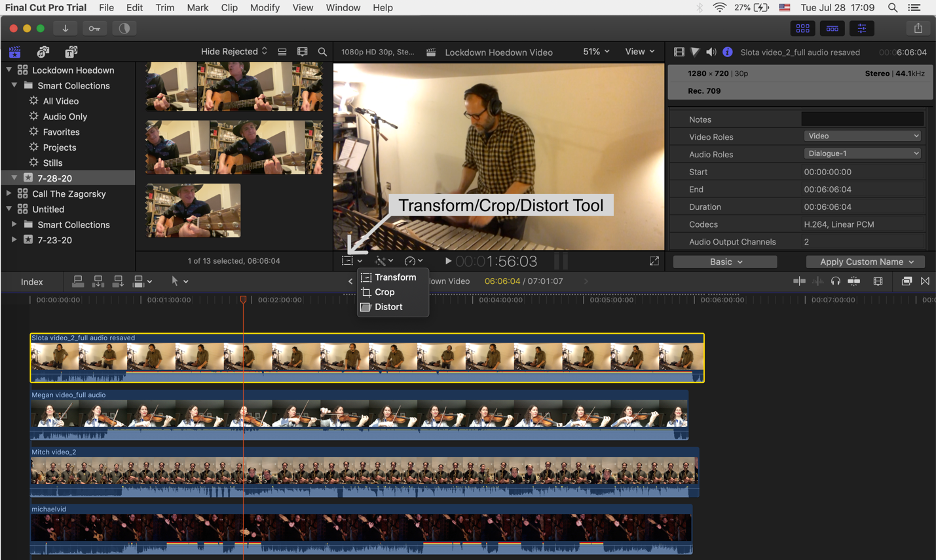
To crop video clips:
- Select the top video (Slota) in the timeline (since that is the only one visible).
- Click on the "Transform/Crop/Distort" tool in the preview window.
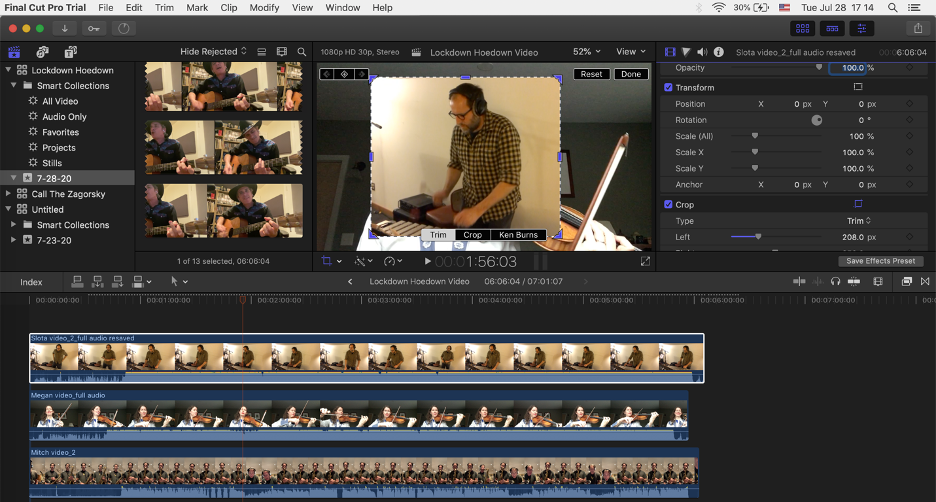
- Select "Crop/Trim" and make a square crop of the video.
- The video (Megan) below it in the timeline appears as the background.
- Select that video (Megan) in the timeline and then crop it to fit directly behind the first video (Slota) you cropped.
- Repeat this for the remaining videos until you only see a square with the top video showing in the middle of a black screen.
Select top video, select crop tool:
Crop videos to desired dimensions:
Next:
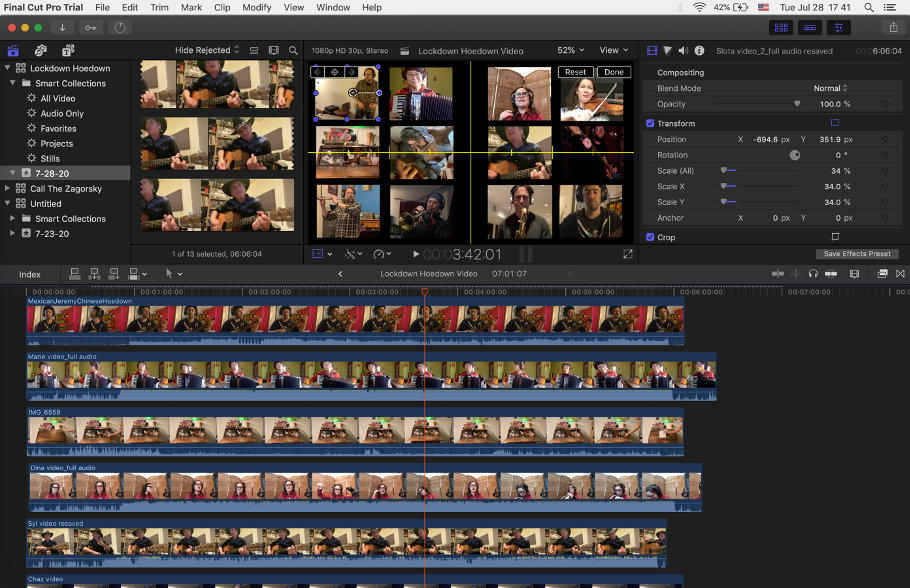
- Select all of the videos in the timeline
- Deselect the placeholder (apple-click),
- Open the inspector window (if it isn't already)
- Click on the video inspector icon, under "Transform" choose "Scale (All)" and set that to 34% using the slider or directly inputting it.
This number will depend on how many videos you want to fit on the screen and how big you want them to be.
Select all videos in the timeline:
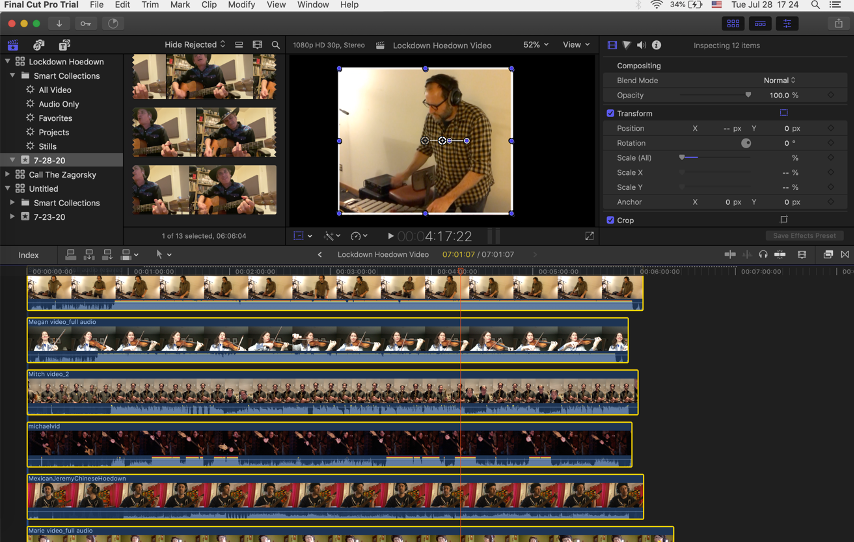
Resize all of the videos:

Then go to the Transform tool under the video preview window and choose "Transform".
Deselect all of the videos in the timeline and select only the top one in the timeline. You can now drag that video square to the position you want on the screen.
Repeat for all of the videos.
To help line everything up, go to the top right of the video preview screen and click the "View" drop down menu and select "Show Horizon".
I added a few more steps to try and get everyone to be the same "size" in the videos, but those weren't necessary.
Show the grid (horizon):
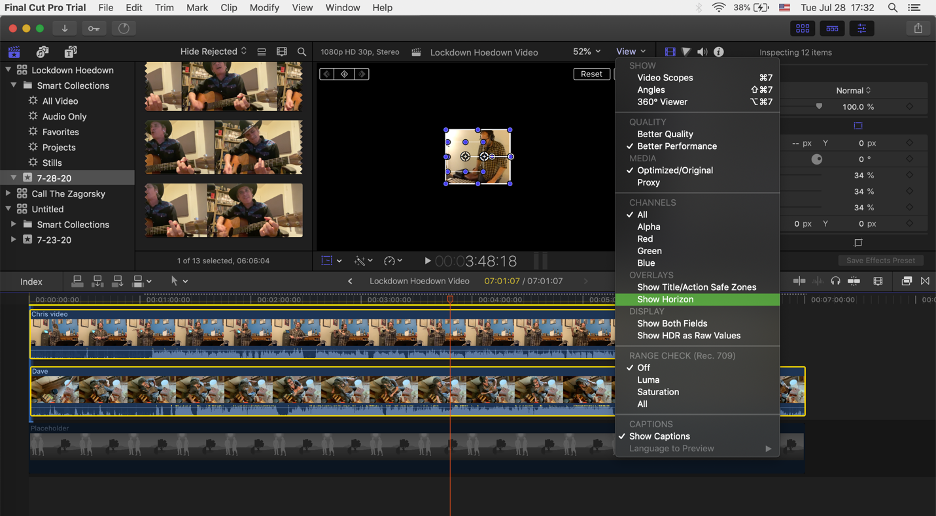
Show the grid (don't forget to hide the grid before your final render):
Place all of the video clips against the background:
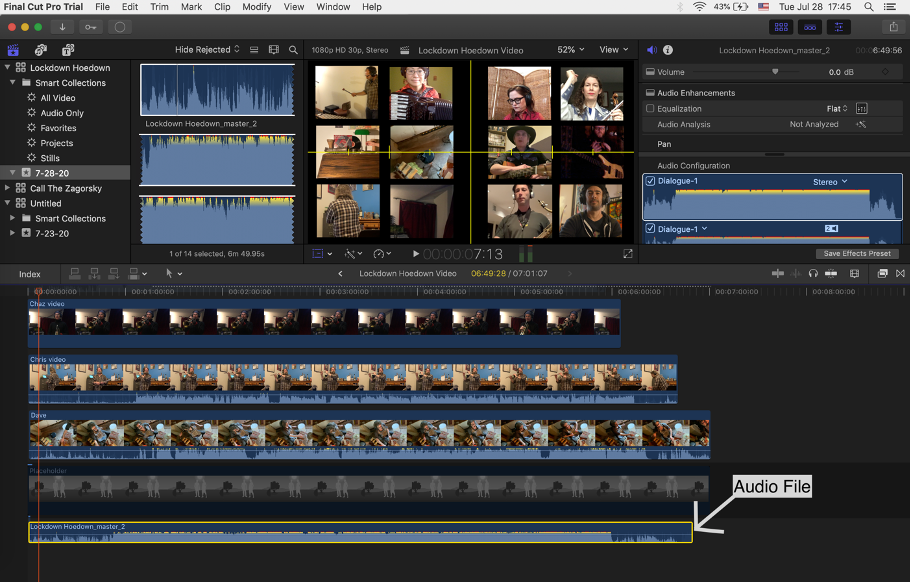
7. Add the Audio File!
Almost done!
I imported the final mixed/mastered audio file and dragged it into the timeline under the placeholder.
8. Sync the Videos!
- Look at the audio signal of each video clip and the master audio clip to find the sync point/clap (it's most likely the peak towards the beginning) or look for the visual clap of each video
- Bring the scroll bar/playhead to the spot, and put a marker there (select the clip and press "M").
- Line up all of the markers and you should be done syncing, or at least pretty close.
Because everyone's clap had a different "feel," I had to nudge a few of the videos forward or backwards just a little as I did the audio in the Logic session.
Add markers to each video clip in the timeline identifying the "clap":
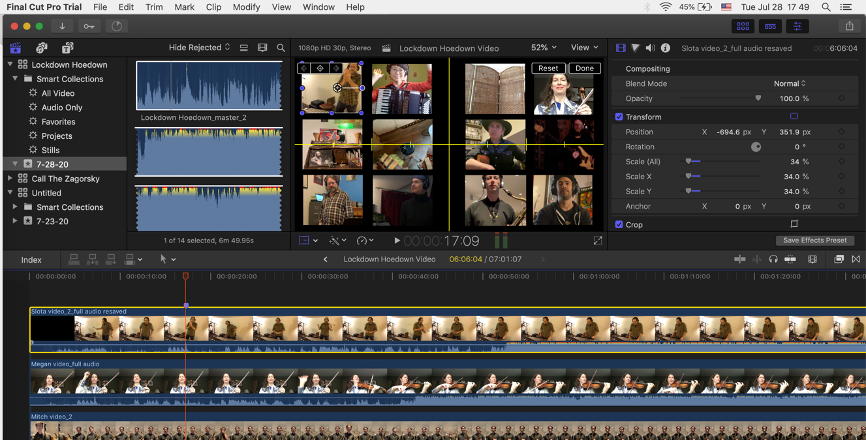
Line up the markers:
9. Final video touches!
The last step was to add an Intro title, trim the clips to set specific "entrances," and add credits to the end.
Final Cut Pro and Premiere both have a lot of options for these.
In Final Cut Pro the menu for Titles is at the top of the Browser window. There are a host of other video effects you can do fairly easily once you've gotten to this point, but this was my first video so I kept it simple. You can also edit out the sync point/clap and have the song start with the first note, but I chose to leave it all in to give it more of the "live in the same room" feeling.
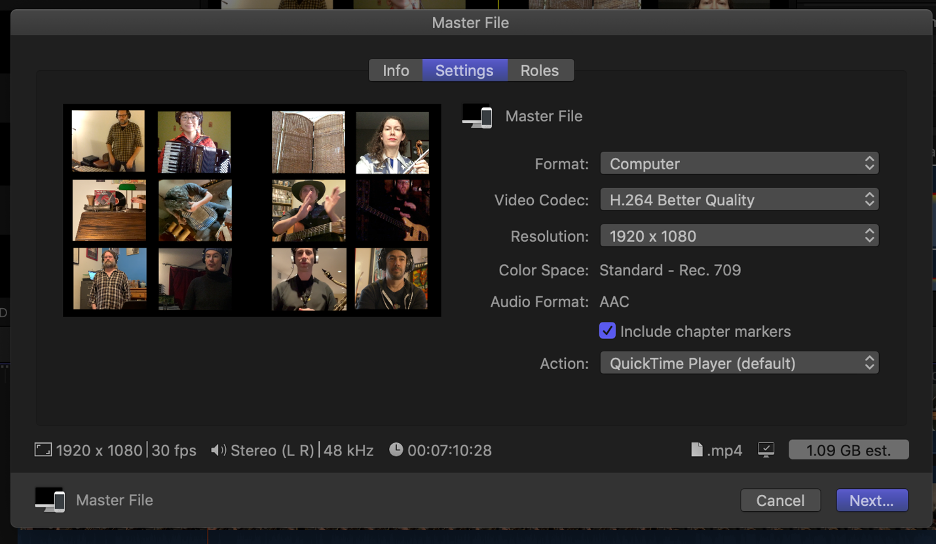
10. Share/render the Video!
The very last step is to "Share" or render the video. In the top Menu bar go to "File - Share" and then you can choose what format you'd like to render to.
I chose "Master File" and set the Format to "Computer" and the Video Codec to "H.264 Better Quality" to get an .mp4 file with Resolution set to 1920 X 1080.
Listen to the Final Project!
Japonize Elephants - "Lockdown Hoedown"
More Recordings
Japonize Elephants -
"Endtimes, Theme From Batboy"
Vandoren Musician's Advisory Studios Presents
"Call the Zagorsky"
There are less involved ways to put together these types of "performance" videos.
If everyone in your project has access to some sort of DAW, it may be a little easier to produce the audio first, have everyone involved video themselves playing along to the finished music, and then put the videos together over the prerecorded music. You can also omit the audio production side of the process and use video editing software to put everything together.
It is possible do some basic audio mixing in the video editing programs, but because I really wanted to be able to have a fair amount of control over how the audio sounded and still create a 'live' sounding performance, I chose to separate the audio and video mixing process.
This definitely created more work for me, but it allowed me to bring 11 recordings of performances done in different spaces and on different equipment, and make them sound as much as possible as if they were all in the same sound space.
There are so many different ways to collaborate with others. The most important thing is to find a way that works for you and go for it! If you have any questions, comments, or tips for me please reach out!
Sylvain Carton
scarton@vandorenusa.com
sylvaincarton.com

About the Author:
Originally from France, Sylvain Carton is a multi-instrumentalist and composer currently residing in Los Angeles. An accomplished saxophonist and guitarist, he tours and records regularly with a number of groups representing a variety of musical genres and traditions, such as John Vanderslice, The Mitch Marcus Quintet, Aphrodesia, The Japonize Elephants, Space Blaster, Khi Darag, Lord Loves a Working Man, Maureen and the Mercury Five, Carolyna Picknick, The Garlando Nonet, and The Sylvain Carton Quartet. As a composer, Carton writes for The Japonize Elephants, an eclectic ensemble of seven to twelve musicians playing vibes, violin, bass, guitar, banjo, accordion, junk percussion, trumpet, flute, and saxophones. He earned his B.M. in jazz performance at Indiana University, and his M.A. in music composition from UC Santa Cruz. To learn more about Sylvain Carton, visit sylvaincarton.com